
Audio and sound
In a media landscape increasingly dominated by images and video, sound is often discounted as being less useful or powerful at transmitting a message. But audio's flexibility and ease of use make it a medium worth a second look. From the megaphone to the mobile phone, sound has long been a universal format for the transmission and documentation of information. In rural areas with little or no internet penetration, radio is king. With a population with low functional or visual literacy, outreach through mobile phones in local languages can prove extremely effective.
When to use audio
One of the best things about audio programming is that it can be used to supplement and support other output.
Your campaign strategy may include events such as public meetings, as well as printed products like ads in newspapers, flyers or brochures. Audio can support and amplify all of these: it can repeat and reinforce the printed information, it can be a feature at an event, or it can extend the reach of the event by allowing you to record the event itself and make this documentation a part of future media output.
You can use multiple platforms to get your audio content out to a larger audience: loudspeakers in public spaces, distribution on CD, airplay from local or national broadcasters, podcasts available on blogs, or written transcripts of the audio on your website. Using multiple platforms will help amplify your message.
Possible formats:
- panel discussion
- phone-in
- single interview
- feature
- radio drama
- audio documentary
- endorsement
- vox pop
- oral history
- testimony
Techniques
The human ear -- an evolutionary marvel -- can also be deceiving. Selective hearing allows us to hone in on certain voices in conversation in a noisy bar, or tune out the hum of a heater or a plane flying overhead.
But the microphone is rarely so forgiving. Barring certain specialised directional models, most microphones will pick up everything, and this can ruin a recording. So when approaching audio recording, it's important to try to listen to your environment like a microphone.
Remember: good audio is audio that doesn't stick out. If the listener does not necessarily notice that the recording is a recording, and rather focuses on the content, then you've done your job right.
- Be particularly conscious of background noise. Buzzing lights, electric hums, ventilation systems and so on emit low-level noise that can be extremely distracting. Be careful also of potential sources of background noise like fridges or vending machines, which tend to switch themselves on and off automatically. If recording an interview in a kitchen, for example, ask if you can unplug or temporarily turn off the fridge – just don't forget to turn it back on afterwards!
- Do a trial recording and re-check the audio for adequate quality levels. Headphones are a must – recording audio with no headphones is like filming with your eyes closed.
- Monitor the audio during the recording. Trust the volume meters, not your headphones, which probably have a volume setting that is independent of the input level.
- Record one minute of 'ambient sound' in the location. This can come in handy later when editing interviews to cover spaces between edits.
- Plan ahead and know in advance what you will be recording, and in what setting. For one or two interview subjects who will be walking around and talking, a wireless lapel, or lavalier mic, is ideal. However, if they will be also talking to different people on the street or doing vox pops, a boom microphone with a windscreen – or a furry muffler designed to reduce wind noise – is better, to be able to capture both the interviewer and the interviewee. In very quiet interior situations, a microphone mounted on-camera might do the job. In every case, the microphone should be as unobtrusive as possible, so that it does not appear in the frame.
- Before starting the interview, record a minute or so of test footage and play back the audio (in a different room, preferably, so that you can distinguish the ambient noise) with headphones to check that the audio is clean and that levels are properly set.
- If using a separate audio recorder, use a distinct signal to facilitate the syncronisation of audio and video during editing. After the camera is rolling, but before starting the interview, use a clapper (or at worst, clap your hands) in front of the camera. The moment the clapper snaps shut can be lined up with the sound of the clap in the audio recording device. Some cameras will accept external audio directly through a microphone or line-in jack, and will record it with the video; in this case, the clapper is not necessary.
- During the interview, maintain good communication and eye contact with the cameraman with respect to the limits of the video frame. If using a boom microphone, try to get the end of the mic close to the edge of the frame, without slipping into it. Whenever possible, try to predict the next movement of the video frame and adjust the mic accordingly.
- Mobile phone microphones are generally very tinny and cut out a lot of frequencies. They are not well suited to recording many things other than the human voice. For a quick interview or vox pop this may be adequate, but for music or ambient noise consider buying an external mic that fits into the data or mic port on your phone, supplementing your phone's recording abilities.
- Switch your phone to airplane mode before starting so that you do not receive any incoming calls during the recording. It happens! Deactivate sleep mode or anything that might disrupt the recording.
- Depending on the make and model of your phone, as well as the application you use, there may be different ways of transferring the audio file from the phone to your computer. For basic phones, transfer via bluetooth or USB cable is the norm. Some smartphones use a shared Wi-Fi connection, a specific browser port or an audio sharing service like SoundCloud to share the audio. Use the method that suits you best. The latter three options are not possible without a wireless connection.
- Recommended tools: for iPhone: BlueFire, Tascam Audio Recorder; for Android: Wave Recorder
- Once you have transferred the files to your computer, use a program like Mobile Media Converter to convert them into a format that you can use in your editing program. Many phones record in .amr or .mp4; you may need to convert these to .wav files in order to manipulate them.Have a first listen to the footage and take note of what you want to keep.
- Doing this as soon as possible after the interview, while it is still fresh in your memory, will facilitate the process of selecting the best sound clips. If it is a simple interview, you may want to keep the whole thing intact. For vox pops or documentary work, you will probably keep only certain sections. Log, if necessary, noting the filename and timecode.
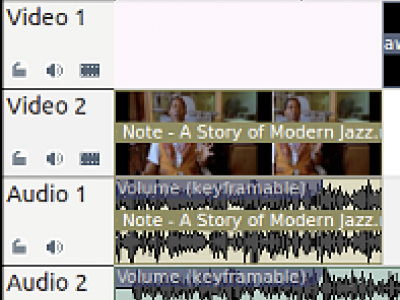
- Understand the difference between destructive and non-destructive editing. Non-destructive editing will reference an audio file and simply record the timecode of the parts that were kept and/or edited ; destructive editing will actually change your file when you save your edits. If you are unsure, make copies of your files first and edit with the copies, so you preserve the original version.
- Be aware of background noise. If you are cutting out an awkward silence or part of a phrase and there was a siren going off in the background of your recording at the time, it will show.
- Don't cut too tight. Allow some breathing space (literally)! Cutting halfway between inhalations results in unnatural speech and rhythm. The first words we speak immediately after breathing in also tend to be louder.


.png%3Fitok=rF0KWQB6)


.jpg%3Fitok=pXDTLHzY)


.jpg%3Fitok=3tJxk_zi)
.jpg%3Fitok=AIh9YY_n)


.jpg%3Fitok=1X702tBf)